Creating Fortnite Rifle Shooting in C++
 Alessandro Belli
TLDR; GitHub Repository: https://github.com/alessandrobelli/TPS-Study
You can try some of what's explained here in this small playground:
See the Pen Shooting Mechanic Playground by Alessandro Belli (@alessandrobelli) on CodePen.
One day, I woke up and wanted to recreate Fortnite’s shooting mechanics in Unreal Engine 5. I decided to start by recreating only the rifle to keep things simple. I quickly noticed two interesting things:
The bullet is shooting from the camera, by default
When you place the player's weapon to the side of a structure, and the crosshair is in line with a wall, the wall is hit. It means the bullet is coming from the camera. Is it coming from the muzzle to the crosshair? Not possible, because you can align the muzzle to be completely parallel to the wall and still it will hit the wall.
Bullet is coming from camera
When the weapon (mesh) has something right in front of it and when the crosshair would be free to shoot, the wall is shot, right in front of the camera. This means that the bullet is coming from the weapon muzzle in this example.
Bullet is coming from the muzzle
Look at the red X on the wall
First, the result
First, I will show you the end result with huge bullets so it's easier to understand and more fun.
From Camera
Weapon is to the side of the wall
From Muzzle
Weapon is facing the wall close
The code
Honestly, this project started, as many while exploring Unreal Engine, with something from other projects. I got the third person controller files from Unreal Engine, I heavily modified it in Blueprint a while ago, and now I'm translating and improving it in c++.
For this demo, I created the following files:
WeaponBaseShooterPlayerControllerProjectileBaseGateComponent
WeaponBase and ProjectileBase are quite self-explanatory; I defined the mesh in both, then, in the former, I defined the FireAnimation, temporarily set it to a specific path—which can be defined from Blueprint in the future—then set up a simple function to play the fire animation:
bool AWeaponBase::PlayFireAnimation() const
{
    	Mesh->PlayAnimation(FireAnimation, false);
	    return true;
}
In the Projectile Base file I also set the Sphere Collision, the Projectile Movement component and the Decal Material of the bullet to spawn.
What's interesting is how to spawn a decal attached to the component it hits. It took me a while, I need to study more UGameplayStatics.
void AProjectileBase::OnHit(UPrimitiveComponent* HitComponent, AActor* OtherActor, UPrimitiveComponent* OtherComp,
	FVector NormalImpulse, const FHitResult& Hit)
{
     // Get the hit location and normal from the hit result
        FVector HitLocation = Hit.Location;
        FVector HitNormal = Hit.Normal;

        // Create rotation from the hit normal vector
        FRotator DecalRotation = HitNormal.Rotation();

        // Spawn parameters
        UDecalComponent* BulletHoleDecal = UGameplayStatics::SpawnDecalAttached(
            BulletDecalToSpawn,           // The decal material
            FVector(5.0f, 5.0f, 5.0f),    // Decal size
            OtherComp,                    // Component to attach to
            NAME_None,                    // Socket name (None in this case)
            HitLocation,                  // Location
            DecalRotation,                // Rotation
            EAttachLocation::KeepWorldPosition, // Location type
            7.0f                          // Lifespan (0 = infinite)
        );

    // destroy the bullet
	Destroy();
}
Now, when it comes to the player controller, we have several functions. One of these is the Gate component. I created it to recreate the feeling of a bullets-per-minute shooting mechanic, allowing you to set the speed at which the weapon fires. The Gate Component comes from this:
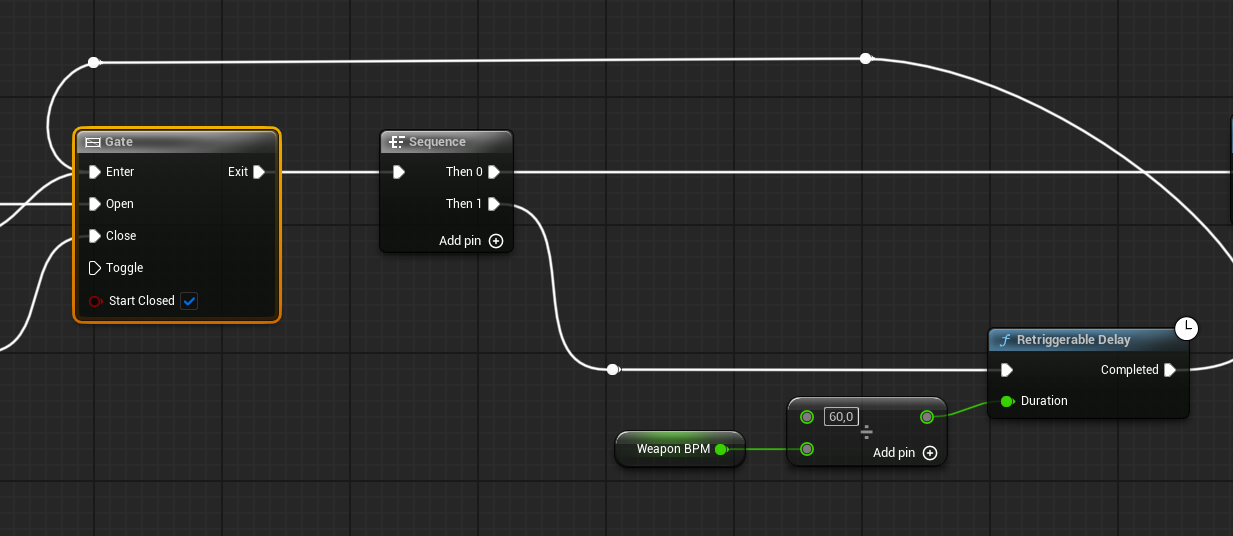
This gate component is nothing but an Unreal Engine 5 macro:
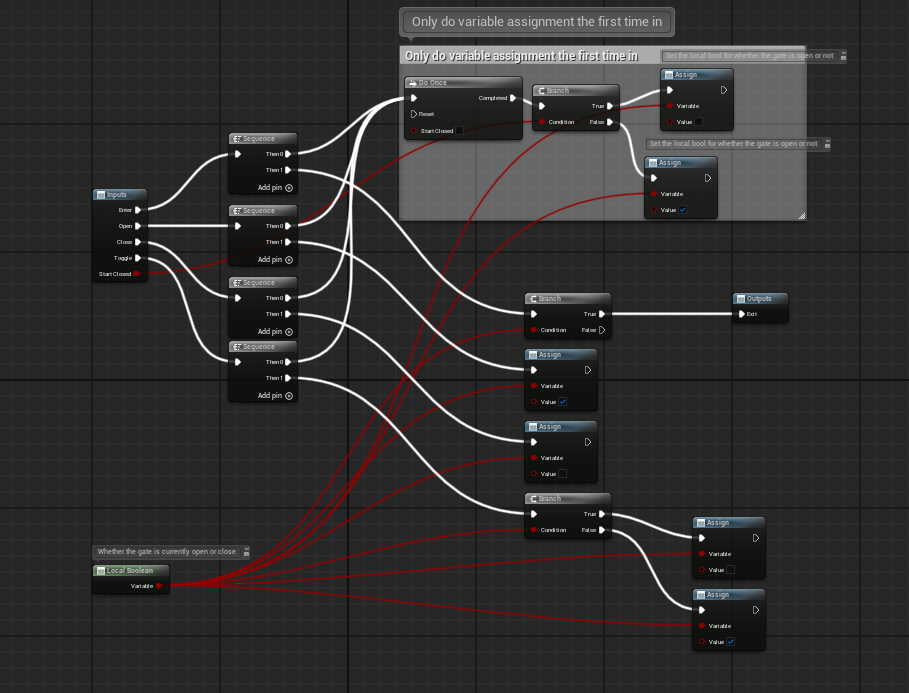
You see that Do Once inside the comment? That is also an Unreal Engine 5 macro.
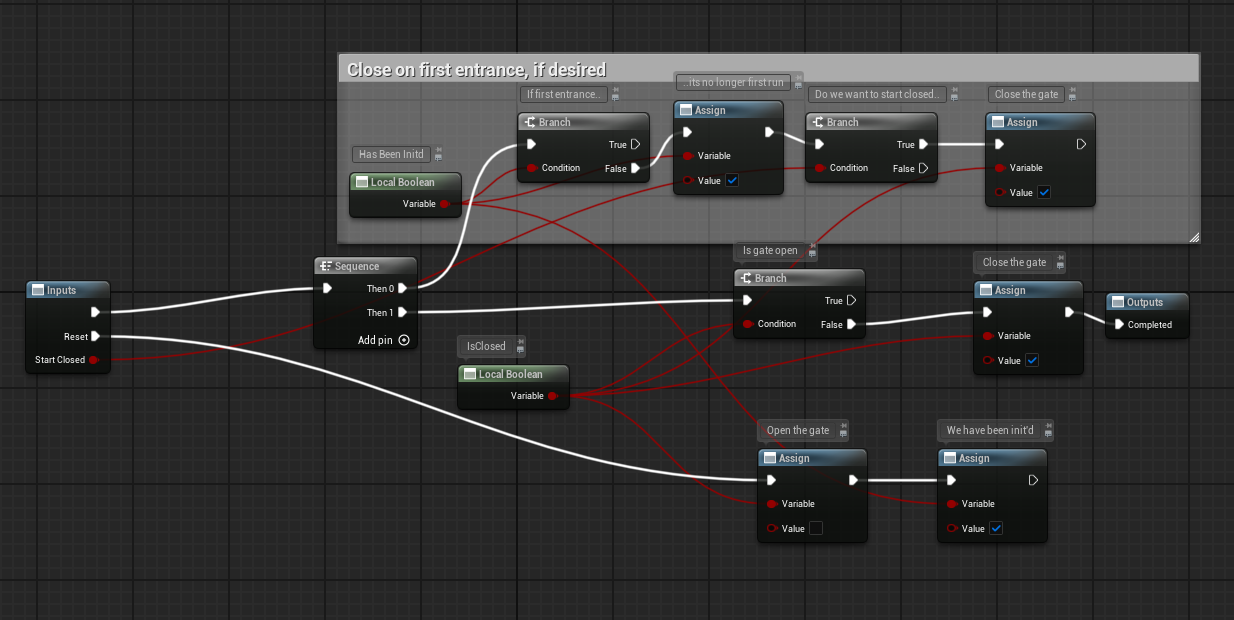
Here’s the C++ translation—probably overkill, but my focus was on converting the blueprint first before optimizing:
UGateComponent::UGateComponent()
{
    PrimaryComponentTick.bCanEverTick = false;
}

void UGateComponent::DoOnce()
{
    if (bDoOnce)
    {
        bDoOnce = false;
        bLocalBoolean = !bStartClosed;
    }
}

void UGateComponent::Enter()
{
    DoOnce();
    if (bLocalBoolean)
    {
            // call the callback function
           OnGateEntered.Broadcast();
    }
}

void UGateComponent::Open()
{
    DoOnce();
    bLocalBoolean = true;

}

void UGateComponent::Close()
{
    DoOnce();
    bLocalBoolean = false;
}

void UGateComponent::Toggle()
{
    DoOnce();
    bLocalBoolean = !bLocalBoolean;
}

auto UGateComponent::IsGateOpen() const -> bool
{
    return bLocalBoolean;
}
Once again, the goal here isn’t efficiency, but faithfully converting the Gate and DoOnce Blueprint functions into C++ before refining.
Now, we come to the core of the PlayerController.
Some words about the public file: I defined several booleans and variables that are not used in the code. This is again the process of "translating" the blueprint to c++. First I "blindly" move every single variable to c++ and during the process, or later on I refine them.
Same concept goes for the UInputActions with meta=(AllowPrivateAccess = true) while being in a public section, they will probably be moved to other sections, but for now I'm keeping them here for debugging.
Let's look at what's actually interesting: the shooting mechanic. This is what I did to achieve the desired fire rate, or Bullet Per Minute:
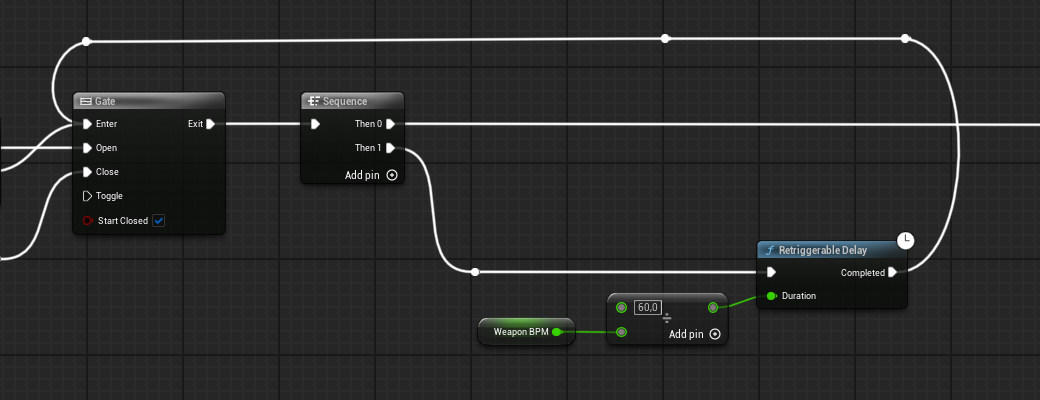
What this does is opening the gate until is "Closed" by the "Completed" pin of the input action, and with the retriggerable Delay we make sure we are shooting the correct amount of Bullet per Minute.
What I did to translate it into C++ was to bind the input actions in this way:
		EnhancedInputComponent->BindAction(FireAction, ETriggerEvent::Started, this, &AShooterPlayerController::ShootWeaponAction);
		EnhancedInputComponent->BindAction(FireAction, ETriggerEvent::Canceled, this, &AShooterPlayerController::StopShootWeapon);
		EnhancedInputComponent->BindAction(FireAction, ETriggerEvent::Completed, this, &AShooterPlayerController::StopShootWeapon);
The bound function is rather simple: check if you should open the gate, then enter it.
// 1. Shoot weapon action
void AShooterPlayerController::ShootWeaponAction()
{
	if (bReloading || bIsHealing) return;

	// Check if the gate is open before firing
	if (!GateComponent->IsGateOpen()) GateComponent->Open();
	// Call the gate component's Enter function, which will trigger the FireWeapon function
	GateComponent->Enter();

}
Since the gate is a delegate component, when we "enter the gate", we bind this function: GateComponent->OnGateEntered.AddDynamic(this, &AShooterPlayerController::FireWeapon);
// 2. Fire weapon called from Gate Enter Delegate
// Retriggerable delay and FireDelay helps to fire the weapon at a certain Bullet x Minute rate
void AShooterPlayerController::FireWeapon()
{
	ActualFireCode();
    // Create the latent action info
    FLatentActionInfo LatentInfo;
    LatentInfo.CallbackTarget = this;
    LatentInfo.UUID = UUIDLatentAction;
    LatentInfo.Linkage = 0;
	// if we could place directly GateComponent->Enter() this would change
    LatentInfo.ExecutionFunction = FName("EnterGate");

    // Call the retriggerable delay - from UE5 counts down and triggers it's output link when the time remaining falls to zero
    UKismetSystemLibrary::RetriggerableDelay(this, FireDelay, LatentInfo);
}
The retriggerable delay function - the same used in the blueprint
To feed the function of the delay, we need to fill the info with FLatentActionInfo.
ActualFireCode is simply calling FortniteShootCpp.
Examining the FortniteShootCpp function reveals several key technical aspects that enable the dual-origin shooting system observed in Fortnite.
The function implements a conditional trace origin selection mechanism:
// if there's nothing directly in front of the muzzle, use the camera location, otherwise use the muzzle location
if (!FirstHit.bBlockingHit || (FirstHit.ImpactPoint == FVector::ZeroVector))
{
   ActualWeaponTraceStart = CameraLocationStart;
}
This enables shooting from the camera perspective when possible, while preventing clipping issues when obstacles are near the weapon.
The dot product calculation serves as an elegant mathematical solution to determine spatial relationship:
float DotProduct = Dot(CharacterForward, HitDirection);

// If dot product is positive, hit is in front of character
if (DotProduct > 0.0f)
{
   ProjectileStartingLocation = ActualWeaponTraceStart;
}
else
{
   ProjectileStartingLocation = WeaponStart;
}
This vector analysis ensures proper projectile origin selection based on relative positioning of character and target.
If the camera hides the character behind something, the bullet won't hit that object and will instead shoot from the muzzle.
A particularly important technique is the addition of character velocity to projectile velocity:
FVector CharacterVelocity = GetVelocity();
FVector ProjectileVelocity = (LaunchDirection * 20000.0f) + CharacterVelocity;
This compensation method resolves the common physics issue where projectiles appear to originate from behind the weapon during character movement.
This study successfully recreates Fortnite's hybrid rifle shooting system, demonstrating a practical solution to the common challenge of balancing player aiming precision with visual fidelity in third-person shooters. The implementation shows how Fortnite intelligently switches between camera-based and muzzle-based shooting origins based on environmental context.
The key technical components working together include:
- Contextual trace detection to determine obstacle proximity
- Vector mathematics (dot product calculations) to establish spatial relationships
- Physics-aware projectile spawning with velocity compensation
- Rate-of-fire control via the GateComponent delegate system
While this implementation addresses the core mechanics, several areas warrant further work: ballistic trajectory simulation, recoil pattern generation, and network replication strategies for multiplayer environments.